Subscribe For Free Updates!

We'll not spam mate! We promise.

Monday, November 7, 2016

The basics of Youtube rankings


SEO on YouTube may be one of the most neglected things there is. Subscribers, shares, and comments which build a community are all important, but at the bottom of everything done online is SEO.
YouTube SEO is similar to how you build a website’s SEO, with some differences. One difference you won’t find, however, is that better ranking equals better chances of making money. Let’s look at those differences so that you can better monetize your videos, whether it’s for monetization right on YouTube, or if you’re using video to support a monetized website.

Basic YouTube SEO concepts

YouTube is tracking every single thing about your videos that it can, and using that data to rank them. One of the most important, and seldom discussed, is Watch Time. Think of it as bounce rate for video. Videos with longer watch time, and a higher percentage of their video being watched, rank better.
Here are the things which you need to think about in order to better your SEO:
  • Your YouTube Analytics will show you your Watch Time stats. Take this information and apply it to your videos. Are there slow spots which cause people to click away? Should you stop putting in linking out Annotations mid-video. Pay attention to trends which hurt your Watch Time.
  • Your editing of your video will determine how successful they are. If what you’re creating doesn’t match with what the title promises you will lose viewers early.
  • The keywords you’re using can be the wrong ones for your audience. Sure, you’re ranking well for something, and bringing in viewers, but are they the people who actually want to watch you? This could explain why you have people clicking away quickly as they may have wanted information when you created a funny video, or the other way around!
This may be the whole key to your YouTube SEO. It is not a one-time only consideration, it is an ‘every video you upload’ consideration. Keep learning, keep adjusting, and you will one day be getting the absolute most from your video SEO.

Proper keyword planning on YouTube

Ok, you understand YouTube’s most unique SEO component, Watch Time, now let’s look at an old familiar topic: keyword planning. You’re going to want to do the same planning here as you would on your website. Look for, and use, words which your desired viewers are looking for.
Let’s learn a little from our own searches. I like to learn about the newest basketball sneakers, let’s see what turns up when I search for ‘basketball performance shoes’:
youtube seo rankings search results example
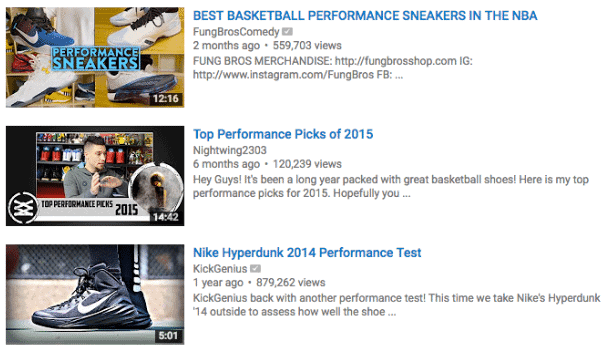
The top 2 are exactly what I’m looking for. The bottom one is not. If that video was trying to optimize for ‘basketball performance shoes’ they may want to reconsider. They are featuring one shoe, and a specific model. A better approach may be to try for ‘hyperdunk review’ or ‘budget performance basketball shoe’ instead of this broad topic the video doesn’t fit in.
As always, be sure to use Google Adwords, and any other keyword search, to figure out what will work for you. Doing a competition keyword search, where you test your chosen keywords to see what content comes up, is also a wise investment of your time.

Where do we put these keywords?

YouTube SEO is different from regular SEO as you are now going to put the keywords in the:
  • Video title, instead of the page title.
  • Video description, instead of the meta description.
  • Video tags, instead of alt tags.
  • Video script, instead of article text.
Placing your keywords in each of these places is a key component of making your keywords work. Do not forget the last point as you can easily create a transcript and upload it to your videos.
Read the titles and description of videos which use the same keywords as you. There’s a lot to learn there, and you can borrow some of these ideas for your own keyword use.
Take a look here how well Nightwing2303 sets his video up for good SEO in the title, transcript, and description for ‘Nike Air Max Audacity 2016’ in this image:
youtube seo rankings keywords example
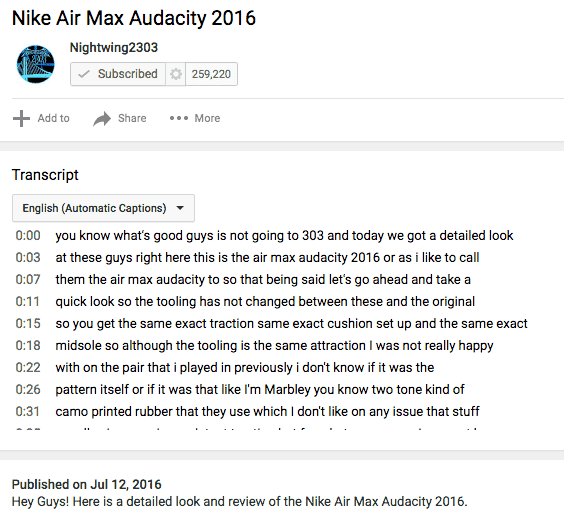
We can also take a look at his tags by looking in the page source and searching ‘keywords’ in the code:
youtube seo rankings tags example

Video descriptions deserve more time

I wanted to focus on descriptions a little bit more because you should focus on them more too. Here are 3 points to keep in mind when you write them:
  1. The 1st sentence is what displays in search results. Fit in a call to action to watch, or at least a compelling reason, with the person searching for it in mind. In my search above, would they be better off using a first sentence that goes ‘See why these shoes are so comfy and great for shopping in,’ or ‘See why these shoes are great for hooping in all day, in outdoor or indoor courts.’ If you can’t see which is the right first sentence, you’re in the wrong business.
  2. Keyword stuffing is as frowned upon here as it is in website SEO. Using secondary keywords, and synonyms, is still valid though.
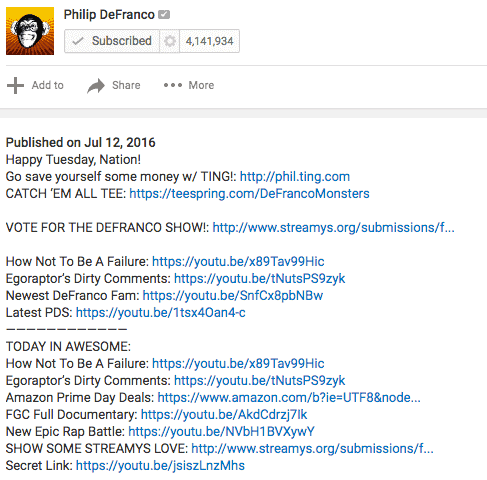
  3. Don’t be afraid to link out to your website, or blog, to give people more information. Top YouTubers like Philip DeFranco include links in the description and mention it to their viewers. Video creators who do this are seen as a resource with useful information, and that can keep people coming back to watch you over and over.
YouTube video descriptions are more than just a place to stuff your keywords. Here’s what I was talking about with Philip DeFranco:
youtube seo rankings description example

Number of views

Ok, let’s be real for a second: YouTube has never flat out said that views count towards SEO. But come on. Do you ever see a video with millions of views ranking poorly? SEO is all about search engines reading signs that a video is worth ranking higher than another, and popularity has always been a factor in one way or another: Watch Time certainly confirms this.
So you need more views to get better SEO, but you need better SEO to get more views… Ouch.
Feeling dizzy? Don’t!
What you have to remember here is that you have many more ways to influence your view number besides SEO! This is why it’s so important to:
  • Embed your videos on your website.
  • Push your videos on social media.
  • Link videos to one another to keep people watching. Annotations are great for this.
  • Create ‘best of’ videos which link out to the original video.
  • Have ‘thank you’ videos when you hit milestones.
Each of these is another step in getting more views on your videos, and increasing the SEO of them. To look at the last one, here’s a special ‘thank you’ video from the Vat19 crew:


Who wouldn’t want to watch a few more of their videos to see what they’re about after watching that?

Building links and video distribution

Yep, your video needs links pointing to it just as much as a website. While Google’s Pagerank may not apply as directly, you are going to use the same tactics on your video as your website:
  • Try to get your videos linked to from websites which are related to your video content.
  • Use a call to action to view the video as the number of views it gets on that website impacts SEO.
You’ll use the same outreach tactics, getting in touch with webmasters any way you know how, to make this happen.
Don’t forget the other basics of SEO:
  • Email marketing, with your videos embedded and a push to embed it on their websites as well.
  • Press releases being sent to the right people.
  • Putting video on landing pages which are link targets already.
  • Getting in touch with viral influencers via social media.
As you’ve probably figured out by now, YouTube SEO takes many of the aspects of website SEO and puts a spin on them. Your video SEO involves every aspect of what you do online, just like with your website. Have a complete plan, which touches everything you do online, and your videos will rise in the search engine rankings.
Author’s Bio: Matthew is the writer for Devumi.com’s weekly blog. Visit him there every Friday, or give the @Devumi Gorilla a follow on Twitter to stay completely up to date on the world of social media!

SEO earnings vs. Google Rankings – Are you ready to bank?


Have you ever wondered how much money can you earn if you rank a website in the first position of Google? How do you even calculate it? Well, that’s what we’re learning today.
I always say I want to keep my posts short and they end up being 2,000 words long. This time, it’s going to be sure because I want to keep it simple and straight to the point.
So, what’s the earnings difference between being ranked 1st, vs. being ranked 2nd, or 3rd, or maybe on the 10th position of the first page? Let’s calculate it!

Earnings vs. Rankings – Case study

For this little case study, I was able to rank 3 different articles with 3 totally different monetization methods on their own. 2 of them were relatively low competition search queries with low volume, and one had high volume with medium competition. All of them started ranking in the first 10 pages of Google and then moved to the 2nd page and then onto the 1st page.
Basically none of them were earning money before entering the first page, which is very important because unless you’ve got a super high volume search query, you probably won’t earn anything if you’re not in the first page.

Article 1 – Low-Mid search volume + high paying offer

The first site we’re analyzing had an article that was ranking between the 10th and 1st position (different days) and was a review of a product that pays a $100 commission for each new customer you send.
Search volume was low, but there were a few long tail keywords that boosted the traffic and the conversion rate was so-so.
  • Search volume: 3,500 searches per month
  • Average traffic per day ranked on 1st place: 45, but it was receiving some long tail keyword traffic and averaging around 70 visits per day
  • Payout per conversion: $100 after they bought a $200 service
  • Earnings per month: $1,300 (13 conversions)
  • Conversion rate: 0.6% (13 conversions out of 2,100 visits per month)
As you can see, this article alone was able to earn $1,300 per month on autopilot while being on the first place. The competition is tough in this niche, so I was only able to maintain this position for a few weeks. Right now I’m dancing between the second and fourth place in Google rankings.
However, I noticed that the traffic and earnings were considerably reduced after the rankings reduction. It was something like this:
Rankings (Google) – Earnings (USD)
  • 1st place – $1,300-1400 per month
  • 2nd place – $700-800 per month
  • 3rd place – $400 per month
  • 4th place – $200 per month
  • 5th place – $200 per month
And basically anything between the 5th place and the 10th place in Google rankings were earning no more than $100-200 per month.
That means the first place can earn at least 10-14 times more than the 10th place in this test. Hence the importance of being in the top 5 spots to get more traffic AND revenue.
The traffic had the same trend according to the rankings, and I was able to get at least 5-10x more traffic while ranked on the first place vs. the 10th place.

Article 2 – Medium search volume + low paying offer

The second article was being ranked on a parasite website and was targeting a CPA offer that converted after an email/zip submit. Contrary to the first case, where people had to buy a service that costs $200 per year so I could get a $100 commission, this time they just had to fill their email info and zip code in order for me to get a commission of $1.6 USD. You can find offers like this in CPA networks such as Neverblue and Peerfly.
Obviously, the conversion rate was higher and somehow compensated the low payout for the offer. This keyword had medium competition on search engines and a mid-sized search volume.
  • Search volume: 20,000 searches per month
  • Average traffic per day ranked on 1st place: 270, but it was receiving some long tail keyword traffic and averaging around 300-350 visits per day
  • Payout per conversion: $1.6 after email/zip submit
  • Earnings per month: $1,450 aprox.
  • Conversion Rate: 10% (around 900 conversions from 9,000 visitors per month)
Don’t ever underestimate low paying offers or affiliate programs just because you want the big bucks. I earned almost the same amount of money and even more by promoting a $1.6 offer vs. promoting a $100 offer just because the conversion rate was a lot higher. Golden nugget right here.
The earnings and traffic dropped pretty much the same was as with the first article.
Rankings (Google) – Earnings (USD)
  • 1st place – $1,400-1500 per month
  • 2nd place – $700-800 per month
  • 3rd place – $300-400 per month
  • 4th place – $200 per month
  • 5th place – $100 per month
  • etc.
Which means, the first place earns twice as much as the second, and 3 times as much as the third place and so on. The better you’re ranked, the higher your conversion rate will be since your traffic will be brand new to the topic instead of having visited all your competitors before (and probably bought from them).

Article 3 – High search volume + low paying offer

For this last case study I was able to rank just for a few days an article for a high search volume keyword and I was able to monetize it with a CPA offer.
I wasn’t able to maintain this keyword for as long as the rest, but I can easily assume what would have happened if I had ranked in different positions because the trend was similar and because the conversion rate was so high that I had enough data to get statistical significance.
Google hates this kind of sites, so it was erased from their search results after 2 weeks. Here are the results:
  • Search volume: 120,000 searches per month
  • Average traffic per day ranked on 1st place: 1,600, but it was receiving some long tail keyword traffic and averaging around 1,800 visits per day
  • Payout per conversion: $1 after phone PIN submit (hence why Google banned it after a few days)
  • ESTIMATED Earnings per month: $10,500 aprox.
  • Conversion Rate: 20% (around 350 conversions from 1,800 visitors per day / 10,500 conversions from 54,000 visitors per month)
SEO earnings rankings
This experiment was crazy, as I was able to rank between the first and second place in the 1st or 2nd position for this keyword and make some good money from it. After 10 days the site had already disappeared from Google (after a penalty).
I’ve got to recognize that those sites are the kind of sites Google really hates. I know tons of people banking from it, and that’s all I’m going to say. Of course it’s not easy to rank for them, and it’s even more difficult to keep them ranked because there’s competition and they tend to disappear from Google after a few days/weeks, but it was fun to try it.
I mean, if a single site with just 1 article was able to make $10,000 per month, imagine if you could rank 3-5 of them per month? Some SEOs are banking hard just with CPA offers, and as you can see, even if it’s a simple offer that pays $1, as long as your conversion rate is good, you can make big bucks without ranking for “weight loss” and promoting a $200 Clickbank product.

How to create a Facebook Fan Page?


A Facebook Page, best known as “Fan Page” is a public profile where you can share everything with people connected on Facebook. The main goal running a fan page is to share valuable content in order to engage with a specific audience that matches your business goals. Here, I´ll show you in 10 easy and fast steps, how to create a Facebook Fan Page from the beginning.
Before you begin you must have this first:
  • A Name for your Fan page. Sometimes a name comes easy, but sometimes we can’t come up with a name instantly. It’s better to have a name and some variations if the name is already taken. This will let you complete the whole process in minutes.
Note: To create a Facebook Page you must have a personal Facebook Profile. If you don’t have one, you can register on Facebook here.

Step 1. Create a Facebook Page

  1. Log in Facebook
  2. Click on the facing down arrow located at the top right in the main menu.
  3. Find “Create Page” in the drop-down menu.
You´ll be shown the different page types available:
how to create a facebook fan page types

Step 2. Page type.

If you want to know how to create a Facebook Fan Page first you have to understand the six different page types. Depending if you want to act as a store, a public figure or a brand is the type of page you must choose.
  • Choose “Local Business” if you own a physical store, a restaurant, a service office, etc. All business that are willing to receive visitors should enter this category, because Facebook will allow you to put your address, open hours, parking options and location with a map. Your visitors also will be able to “check in” your business on Facebook.
  • The page type “Company, Organization or institution” is for businesses that don’t have visitors and also for businesses that have several stores or franchises. E.g. Businesses that offer online services or digital products.
  • Choose “Brand or Product” if you are a brand and your product or your products are sold or will be sold through more than one retailer or website. e.g. Apple, Samsung.
  • For individuals like entertainers, actors, artists or groups like bands that want to promote themselves as public figures the “Artist, Band or Public Figure” is the right choice.
  • The “Entertainment” page type is for businesses that the main focus is to entertain people. E.g. TV Shows, Movies, Books, Magazines, Apps, Games, etc.
  • “Cause or Community” is for fan pages sharing content not related to a business or a product. There are several fan pages sharing content about general topics like beauty, home decor, games, etc.
As choosing a page type can be confusing, you can click on each page type and it will appear one or two drop down menus with categories that will help you to find the best page type for you.

Step 3.- Name and Category

Once you have decided a page type, click on the picture and you´ll be asked to give a name for your fan page and you´ll have to choose a category that best describes your future fan page. This name is the one that will be displayed as your fan page name but not necessarily the same in your page URL, which you´ll be able to set in the following step.

Step 4.- Description, Website, URL

In this part of the process you can add a description of your page which can be changed whenever you want. Also you can add your website URL if you already have one.
Also, here you can set your fan page URL. Once you set it, you can only change it one more time.
how to create a facebook fan page set up

Step 5.- Profile Picture

If you want to know how to create a fan page on Facebook you have to consider that you have to upload some images with specific dimensions and quality. It is an easy job to do by yourself using Photoshop and Illustrator in a very basic level, otherwise you can pay a little bit for it.
The profile picture size must be at least 180 x 180 pixels, but it will appear on page as 160 x 160 px. Facebook will scale photos under the minimum dimensions. For better results, increase the image resolution at the same scale as the minimum size. e.g. Upload a 1080 x 1080 px image less than 100 KB.
how to create a facebook fan page profile picture

Step 6.- Add a Shortcut on Favorites

In this step Facebook allows you to add your new page to your Favorites list as a shortcut. It will appear in your sidebar menu at the top.
How to create a facebook fan page add favorites

Step 7.- Set up your Preferred Page Audience

This is a new tool recently added that allows you to tell Facebook which audience is most important to your business. Your Facebook fans who fall in your specified group are more likely to see your future posts and connect with you. It’s important to learn how to create a fan page on Facebook but you need to know your business goals first and that includes your target market.
  • Set up Location: You can specify Countries or specific cities.
  • Specify Age: You can add an age range between 18 and 65+.
  • Select Gender
  • Add specific Interests if necessary. You can target people that already show interest in specific topics or even other popular Fan pages.
  • Finally, select a Language.
How to create a facebook fan page preferred audienceIf you want to set up an audience for an existing Fan page:
  • On your Fan page, click on “Setting” at the top right.
  • Find “Preferred Page Audience” on the left sidebar.

Step 8.- Add Cover

Once your Facebook page is created you can add your page cover by clicking on the “Add Cover” button located at the top right, you can find it easily searching a camera icon.
How to create a facebook fan page add cover
A drop-down menu will be shown, choose the option “Upload Photo” if you want to add a picture from your computer.
The image for the cover will be shown in 851 x 315 px. It should be at least 400 x 150 px. Remember that Facebook will scale photos under the minimum dimensions. For better results, increase the image resolution at the same scale as the minimum size. Your cover page should be less than 100 KB to avoid resizing.

Step 9.- Add Call to Action Button

Not everyone knows how to create a Facebook Fan Page taking advantage of every useful tool that Facebook provides like the “Call to Action” Button.
A “Call to Action” button helps you to drive people to do specific actions like:
  • Book Now
  • Call Now
  • Contact Us
  • Send Message
  • Use App
  • Play Game
  • Shop Now
  • Sign Up
  • Watch Video
  • Send Email
  • Learn More
Looking at the picture above, you´ll find the “Add a Button” button located on the bottom right of your Facebook cover area. It will show you a set up page for a specific call to action, where you can add the URL of your landing page.
How to create a facebook fan page add call to action button
Options like “Send Message” will let you set an automated instant reply message for those who left a message in your inbox.
While you chose your options you can see a desktop and mobile preview of your call to action button on the right.

Step 10.- Publish your First Post

Now that you know how to create a fan page on Facebook you must add some content to make it look ready for your first fans. At this point you may want to know how to get likes on Facebook Page.
You can post text, pictures in different formats, videos and different types of ads on Facebook.
If you want to post your welcome text, you just type your message on the white text field always located below your cover at the right.  The default post is set as “Status”.
How to create a facebook fan page first post
Below your text, you can add a picture or several pictures and even video by clicking on the “camera” icon located at the bottom of the text field. You can also add emoticons that express feelings and activities next to your message by clicking on the “happy face” icon.
Finally, you can check in a place by clicking on the “check in” typing the place name. You can also schedule a post by clicking “Schedule” option located on the drop down menu. This option allows you to schedule your post and pick a date and time to post it. With the “Backdate” option, you can post something and place it in a specific day and time from the past in your timeline. With the option “Save Draft” you can always save a draft of your post if you need to.
If you want to post pictures or videos click on the “Photo/Video” tab to choose from the different options that Facebook offers.
How to create a facebook fan page upload photos
The menu is very intuitive and the most popular option is the first one. You can also add text to your pictures and videos from this option. Once you are ready, click on the blue button “Publish”.
You can always edit or delete your posts by clicking on the drop down menu on the top right of your post frame.
How to create a facebook fan page edit post
Now you know how to create a Facebook fan page, you must fill it with great and unique content. It´s important to post often to keep your followers engaged with your content.

Types of Facebook Ads to grow your website


Running ads on Facebook is by far one of the best ways to achieve some business goals, and that’s why you need to know all the types of Facebook ads. Understanding the objective behind Facebook ad types is key to run successful ad campaigns.
Everything you need to do like create, edit or check your ad stats you’ll find it inside your Ads Manager.
To open your Ads Manager, click directly in the facing down arrow located at the top right on Facebook. A drop down menu will appear showing you several options, click on “Create Ad” or “Manage Ads”, both will lead you to your Ads Manager.
When you click on “Create Ad” you’ll be shown all the types of Facebook ads by objective.
Types of Facebook Ads
Facebook shows first a list of objectives that help people to choose the correct ad type that matches a specific business or personal goals.
No matter what type of ad you choose, you´ll always be asked to set a Facebook Custom Audience.
Audience
In this part you can define who you want to see your ads setting different aspects like:
  • Location
  • Age
  • Gender
  • Language
  • Detailed Targeting
  • Connection Type
Here you can learn How to create a Facebook Custom Audience.
You´ll find on the right sidebar the “Audience Definition” panel where you can see a resume of your audience details. At the end it shows you the “Potential Reach” of your audience, which is the number of people that falls in your audience definition.
The “Estimated Daily Reach” is the amount of people that your ad will reach, approximately, according to Facebook calculations depending on your daily budget, which you can edit below.
Types of Facebook Ads - Set Audience
Placements
In this section you´ll be able to set where you would like your ads to appear on Facebook and even on Instagram. Some Facebook ad types have less placements available.
Types of Facebook Ads - Set Placement
You can also choose to show your ads in specific mobile devices like Android or iOS Devices.
Types of Facebook Ads Placements
Budget & Schedule
In this section you can define how much you would like to spend and when you would like your ads to appear.
You can set a Daily Budget or a LifeTime Budget and you can Schedule your ads to run continuously or you can set a time range setting a start and end date.
Types of Facebook Ads Budget & Schedule
When you are done will your ad settings, click on “Continue” at the bottom right.

Type of Facebook Ads

Each of all Facebook ad types is designed to reach a specific objective. Depending on your business goals, you should test some of the types of Facebook ads available to understand which works better for you.

Objectives of Facebook Ad Types

  • Clicks to Website: Drive traffic to a specific website.
  • Website Conversions: Designed to increase specific conversions. You’ll need to create a conversion pixel and add it to your website to make this ad work.
  • Page Post Engagement: This allows you to boost specific posts (text, pictures, video).
  • Page Likes: Get targeted Facebook fans to your fanpage.
  • App Installs: Get installs of an app.
  • App Engagement: Increase engagement in an app.
  • Offer Claims: Create offers for people to redeem in your store.
  • Local Awareness: Reach people near your business.
  • Event Responses: Get attendants at an event.
  • Product Catalog Promotion: Show products from a product catalog based on a target audience.
  • Brand Awareness: Reach people more likely to engage with a brand.
  • Lead Generation: Get leads for your business.
  • Video Views: Get more views to a video.
Facebook ads look slightly different depending on the objective or ad type. However, all Facebook ad types have a basic design structure that helps advertisers to reach their goals.
This is how a Desktop News Feed ad looks:
Types of Facebook Ads Desktop Design
The Mobile News Feed Ad shows almost the same information, the text below the picture shows less words due to the width and the “Call to Action” button.
Types of Facebook Ads Mobile Design
Note: There is a new guideline for the amount of text in your image, basically the more text the less exposure your ad will get.  You can check the text percentage with the Text Overlay Tool.
Let´s dig into all the types of Facebook ads to understand their function.

Clicks to Website

This ad works as a link to a specific URL. The picture and the text below are clickable even if you add a call to action button.
This ad is the best choice if you are seeking to get traffic from a target market on Facebook to a specific URL, for example your new blog post.

Website Conversions

This ad also works as a link to a specific web page, but it is designed to work together with the “Facebook Pixel” which measures the leads that your ad gets.
The “Facebook Pixel” is a code that you must add to your own website to make it work.  The Facebook pixel can be used for three main functions:
  1. Building Custom Audiences from your website for remarketing.
  2. Optimizing ads for conversions.
  3. Tracking conversions and attributing them back to your ads.
When you track conversions you can identify specific actions done by the people that clicked on your ad and entered in your website. There are 9 specific actions called “standard events” that you can actually measure:
  1. View Content
  2. Search
  3. Add to Cart
  4. Add to wishlist
  5. Initiate Checkout
  6. Add payment Info
  7. Make Purchase
  8. Lead
  9. Complete Registration
The Facebook pixel helps you to understand what actions are made by the people that clicked your ad and navigated inside your website.
You can measure how much people that entered your website from Facebook actually bought, or even started the purchase process but left it before buying.
Both types of Facebook ads, “Clicks to Website” and “Website Conversions” look the same in appearance but there are 3 different ad formats:
  • Facebook Links
  • Facebook Carousel
  • Facebook Canvas
The conventional Facebook Links format for both Facebook ad types looks like this:
Types of Facebook Ads Clicks to Website Conversions
Design Requirements:
  • Text: Max 90 characters
  • Recommended Image Size: 1200 x 628 px or larger.
  • Headline: Max 25 characters
  • Link Description: Max 30 characters
The Facebook Carousel is useful to show a product catalog, because you can showcase from 3 to 5 images in a slideshow like this:
Types of Facebook Ads Carousel
You can actually insert different link to each image, which will take people to the page they are interested to see.
Design Requirements:
  • Text: Max 90 characters
  • Recommended Image Size: 600 x 600 px or larger.
  • Headline: Max 40 characters
  • Link Description: Max 20 characters

Page per Post Engagement

Basically, when you post something in your timeline like a photo, a video or text and you want more people reach your post, you can boost your post and reach not only your Facebook followers, you can actually reach a specific audience outside your Fanpage in order to get more organic page likes.
Design Requirements:
  • Recommended Text for photos and video: 90 characters
  • Recommended only for Text posts: 500 characters
  • Recommended News Feed Image Size: 1200 x 900 px or larger.
  • Recommended News Feed Image Size: 254 x 133 px or larger.
Types of Facebook Ads Boost Post

Page Likes

When you want to increase your Facebook followers, running Page Likes Ads is by far the best way to do it. ¿Why? Because you choose who to show your ad and you pay for every fan you get, instead of waiting to be followed for people you don’t know anything about them. Here´s a deep guide on How to get likes on Facebook Page.
Design Requirements:
  • Text: Max 90 characters
  • Recommended Image Size: 1200 x 444 px or larger.
  • Headline: Max 25 characters
The Page Likes Ad looks like this:
Types of Facebook Ads Page Likes

App Installs

With App Installs you can promote an image or a video of your app in order to get more installs. This is by far the best way to promote your app because you can get the people you want to install your app fast. When someone taps your ad, they’ll go right to your app store landing page.
Mobile and Desktop App Installs Design Requirements:
  • Text: Max 90 characters
  • Recommended Image Size: 1200 x 628 px
The Mobile App Installs Ad looks like this:
Types of Facebook Ads App Installs

App Engagement

App Engagement Ads works as a way to promote your app with your app users or people that have installed your app in the past. This way you can show them new releases within your app and take them to specific areas of your app when they click your ad. If some of your users don’t have your app installed, they’ll be asked to install the app.
You can choose from different Call to action buttons to match your goal. e.g Use App, Open Link, Shop Now, etc.
Mobile and Desktop App Engagement Design Requirements:
  • Text: Max 90 characters
  • Recommended Image Size: 1200 x 628 px
Note: There is a new guideline for the amount of text in your image, basically the more text the less exposure your ad will get.  You can check the text percentage with the Text Overlay Tool.
The App Engagement Mobile version looks like this:
Types of Facebook Ads App Engagement Mobile
While the App Engagement Desktop version looks like this:
Types of Facebook Ads App Engagement Desktop

Offer Claims

With Offer Claims a brand or business can offer its customer special discounts or offers. It is an ad designed to catch your fans attention by offering a good deal directly on Facebook.  You´ll be able to run your offer as long as you want or how many people can claim it. Remember that you are always able to reach the people you want when you target your ads to a specific Facebook Custom Audience. This ad is very useful for local businesses that show their nearby customer special offers.
Design Requirements:
  • Offer title: 25 characters
  • Text: Max 90 characters
  • Recommended Image Size: 1200 x 628 px
The Offer Claims Ad looks like this:
Types of Facebook Ads Offer Claims

Local Awareness

This is among all the types of Facebook ads the one that is designed for Local Businesses. With Local Awareness you can reach people near your business. This is great if you want to reach people living nearby or people that visits the area where your business is located. When you create an ad, you´ll be asked to give your business address and the distance around your business which defines the area you want to reach. You can even add a “Get Directions” button to help people find your business.
Design Requirements:
  • Headline: 25 characters
  • Text: Max 90 characters
  • Newsfeed Description: 30 characters
  • Recommended Image Size: 1200 x 628 px
Local Awareness ads are shown like this:
Types of Facebook Ads Local Awareness

Event Responses

The Event Responses Ad is a great way to reach more people and get them to respond your event. Sometimes people doesn’t know about an event that they would have been interested to go, this way you can select the location, age, gender, and interests of people that you think they´ll be interested to assist. When someone clicks your ad, it will automatically add your event to their Facebook Calendar which is great because it has reminders of incoming events.
Design Requirements:
  • Headline: 25 characters
  • Text: Max 90 characters
  • Recommended Image Size: 1200 x 628 px
The Event Responses Ad looks like this:
Types of Facebook Ads Event Responses

Brand Awareness

A Brand Awareness Ad is a new way to show your brand to the people you want to be connected with. The objective of this ad is to make people aware of your brand showing them an ad with a catchy image with a link to your website and a “Call to Action Button” to like your page and to learn more about your website.
This is one of the Facebook ad types that allows you to show an image, a video or even a carousel.
Design Requirements:
  • Headline: 25 characters
  • Text: Max 90 characters
  • Link Description: 30 characters
  • Recommended Image Size: 1200 x 628 px
Brand Awareness Ads are shown this way:
Types of Facebook Ads Brand Awareness

Lead Generation

A Lead Ad is an ad that when someone clicks on it, it is shown a form within Facebook. This forms encourage people to sign up for newsletters, offers, events, etc.
It helps advertisers to reach their goals faster because when someone clicks on a Lead Ad, it opens a form that is automatically filled with the contact information that the user already provided on Facebook.  This way, the sign up process is very fast for those who are willing to sign up.
You can customize your form as you want asking for different information like gender, address, phone number, date of birth and much more options.
Design Requirements:
  • Headline: 25 characters
  • Text: Max 90 characters
  • Link Description: 30 characters
  • Recommended Image Size: 1200 x 628 px
A Lead Ad looks like this:
Types of Facebook Ads Lead Ads

Video Views

The Video Views Ad is the best way to promote a video of your business or brand. This ad is linked to your fanpage, that’s why a “Call to Action” button to lik your page shows at the top right of your ad.
You´ll be able to select the thumbnail of your video for your ad.
You can check the video requirements here.
The Video Views Ad will be shown like this:
Types of Facebook Ads Video Views
Conclusions
A few years ago there were just a couple type of Facebook ads but nowadays you can create a lot of ad sets based on different objectives and different ad sizes. It’s up to you to test which ads convert better or lead to better results.

How to create a Facebook Custom Audience?


What is a Facebook Custom Audience?

A Custom Audience on Facebook is a group of people on Facebook selected by different aspects, for example:
  • Specific Location (Countries or even specific cities, individual or bulk)
  • Age range from 13 to 65+
  • Language
  • Detailed Targeting like specific interests and demographics
  • Connection Types like “Friends of people who like your page” or “Exclude people who like your page”
Facebook Custom Audiences were created as a complement of the different Types of Facebook Ads. This way, when you create an ad, you can reach people that really care about a specific topic or business.
That said, a Facebook Custom Audience is the synonym of your Target Market in business or at least it should be created that way.
There are different types of Facebook Custom Audiences:
  • Customer Audiences:
  1. Customer File
  2. Website Traffic – Facebook Custom Audience Pixel
  3. App Activity
  4. Engagement on Facebook
  • Lookalike Audience
  • Saved Audience

How to Create a Facebook Custom Audience?

To create an audience, you´ll find the “Audiences” option in the Facebook Ads Manager or Power Editor.
Facebook Custom Audience
Here, you’ll be able to choose from the different Facebook Custom Audiences.
Types of Facebook Custom Audiences
If you are inside a Business Manager Account, you’ll find the Create Audience button with the same options.
Facebook Custom Audience Menu
To create a Facebook Custom Audience, click on “Create a Custom Audience” or “Custom Audience”. You´ll be shown different types of Facebook custom audiences.
Create Custom Audience Facebook

Customer File Custom Audience

A Customer File Audience is created when you upload a text file in .txt and .csv format, this can include records on separate lines or in a list separated by commas.
This text file can include:
  • Emails
  • App Users
  • Phone Numbers
  • Mobile Advertiser IDs
This way, you can upload a list of your previous customers in order to target your Facebook ads to make more sells from people registered on Facebook that are more likely to buy again.
To create a Customer File Audience, click on “Customer File” and you’ll be asked to upload a text file.
Remember that Facebook will only include the emails of your customer list file that matches with the Facebook existing accounts, probably around 60% – 80%.
Customer File Facebook Custom Audience

Website Traffic – Facebook Custom Audience Pixel

With the Website Traffic Audience, you can create a group of people who visit your website or you can actually create an audience of people who visit a specific page of your website. e.g. Newsletter Sign up
To make this custom audience work, you must install a Facebook Retargeting Pixel in your Website.
There are 9 specific actions called “standard events” that you can actually measure:
  1. View Content
  2. Search
  3. Add to Cart
  4. Add to wishlist
  5. Initiate Checkout
  6. Add payment Info
  7. Make Purchase
  8. Lead
  9. Complete Registration
The Facebook Retargeting Pixel helps you to identify the actions made by your visitors and this way Facebook automatically adds people to your audience when they do specific actions e.g. Make Purchase
This way you can identify your visitors in customers, people interested in buying, people interested in your content, etc. With this valuable information you´ll be able to make better decisions when you advertise.
To create a Website Traffic Audience, click on “Website Traffic” and you’ll be asked to create a Facebook Pixel.
Facebook Custom Audience Pixel
Here, you can learn How to Set Up Remarketing on Facebook by installing the Facebook Retargeting Pixel.

App Activity Custom Audience

The App Activity Audience is an audience created from the users of your own app. You can group people who take specific actions within your app, which are called App Events. These are the current actions you can target:
  • Achieved Level
  • App Launched
  • Added Payment Info
  • Added to Cart
  • Added to Wishlist
  • Completed Registration
  • Completed Tutorial
  • Initiated Checkout
  • Purchased
  • Rated
  • Searched
  • Spent Credits
  • Unlocked Achievement
  • Viewed Content
You are able to choose a specific action from the previous list or you can actually choose a type of action:
  • Action Taken
  • Action not Taken
  • Combined Action
  • Segment
This way you can target your ads to a very specific group of people in order to achieve your business goals.
To create an App Activity Audience, you must register your App and set up events to reach users.
App Activity Custom Audience Facebook
Here you can learn how to add your app events.

Engagement on Facebook Custom Audience

This is a new type of audience that involves everyone on Facebook who had engaged with your content on Facebook.
You can create an Engagement on Facebook Audience by clicking on the “Engagement on Facebook” option located in the Custom Audiences Menu.
For now, you can create an audience from two kind of engagement:
  • People who spent time watching your videos on Facebook.
  • People who opened or completed a form in your lead ads on Facebook.
Engagement Custom Audience Facebook
If you choose Video, you’ll be asked to set the type of engagement.
Facebook Custom Audience Engagement
You’ll also be asked to set the number of days people will remain in your audience after they engage with your video. People will be removed from your audience after the set time period unless they engage with the content again.
If you choose Lead Ad, you’ll be asked to select your existing lead form. You create lead forms when you create lead ad campaigns. Select a form to remarket to people who have engaged with this form in the past.
You’ll be able to choose who you want to include in your audience based on the kind of engagement they had with your form and enter the number of days you want people to remain in your audience after they’ve opened your lead form. People will be removed from your audience after this time unless they open your lead form again.
Facebook Custom Audience Engagement

Lookalike Audience

While the previous custom audiences are created from people already interacting in some way with you and your business, a Lookalike audience is a group of persons that are not connected with you yet but are very likely to become your customers.
¿Why? Because a Lookalike audience is a group of people with very similar profiles and interests as your customer’s audiences.
By creating a Lookalike audience, you can select an existing custom audience of your customers and this way Facebook studies the information of all your customers and then searches for those Facebook users that have similar profiles and interests. This is a great way to find new customers fast, and a lookalike audience is usually bigger than your custom audiences.
You can create a Lookalike from different sources:
  • Your Custom Audiences of your Customers
  • Your Fanpage Fans
  • A Facebook Pixel
To create a Lookalike audience, click on “Lookalike Audience”.
Facebook Cusotm Audience Lookalike Audience
You’ll be asked to select:
  • Source
  • Country
  • Audience Size
The smaller your audience size the better, because it is more likely to match your target market. When you add your source and country you’ll be shown the estimated reach of your audience in each size from 1 to 10.
Lookalike Custom Audience Facebook

Saved Audience

This is a very useful way to save specific audiences that you often use in your ad sets. A saved audience helps the ad process fast and easy by just selecting an audience from a list instead of setting each audience feature.
You can create a Saved Audience from scratch for future ads by clicking con “Audiences” in Ads Manager. You’ll find the “Saved Audience” option in the “Create Audience” drop down menu.
Facebook Custom Audience Saved Audience
You can also create a Saved Audience when you are defining your audience while you are creating a new ad. You´ll find the option to “Save this audience” and it will be available for future ads.
 Custom Audience Facebook Saved Audience
Or you can actually create it from an existing ad set or you can save it just before you set it when you are creating an ad or ad set.
As you can see, a Facebook Custom Audience is the best way to reach the people that really matters your business, it is up to you to implement it and analyze your own results.